Although Facebook Comments launched in 2011 it wasn’t until recently that I decided to implement the comment system into my blog. There were several reasons why I didn’t pull the trigger on the new comment system when it launched, but the primary reason was simply because there was no out-of-the-box method to export all the comments from my then-comment system to Facebook Comments. However, after kicking around the pros and cons for a bit, I took the plunge and installed Facebook Comments since it will reduce the number of trolls, silence the anonymous commenters, and help facilitate higher quality conversations. That being said, here’s to a fresh start!
Okay, so in this tutorial I’m going to explain how to manually implement Facebook Comments for those of you who choose not to install a plugin or unable to install a plugin due to an old WordPress version you might be running. Let’s get started.
Step 1: Create A Facebook App
The first thing you need to do is create a Facebook App for your website prior to generating the Facebook Comments code. Follow the steps below to create the app:
- Visit developers.facebook.com
- Click Apps from the navigation menu
- Select Register as a Developer from the drop-down menu
- Click Yes on the slider and then Register
- Click Create New App
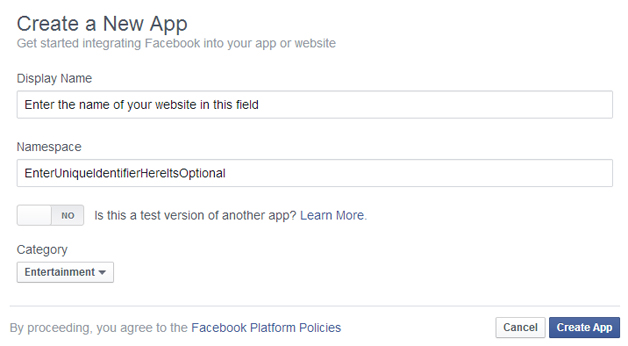
- Enter the name of your website in the Display Name field
- Enter a unique identifier in the Namespace field (optional)
- Choose a category from the drop-down menu
- Click Create App
Below is a screenshot of the Create a New App dialog box.
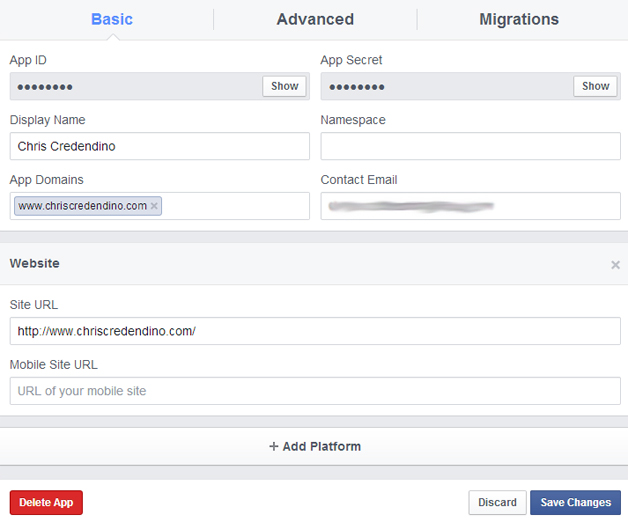
You should now be on a page that displays your App ID and App Secret keys. Although you won’t need the App Secret key, you’ll need the App ID key for Step 2 so please make a note of it.
At the time of this writing, the developer user interface on this page can be tricky so it’s important that you follow the steps below in order to avoid errors. In other words, don’t enter your App Domain before completing the Website section below it. That being said, here are the steps:
- Click Settings from the left-side navigation menu
- Click Add Platform in the Basic settings tab
- Select Website from the Select Platform dialog options
- Enter your website’s URL in the field
- Enter your mobile website’s URL in the field (optional)
- Now go back to the first section and enter your website URL in the App Domains field
- Enter your email in the Contact Email field
- Click Save Changes
Note: If you receive the following error message when you enter your website URL in the App Domains field take another look at the steps above and try again.
“This must be derived from Canvas URL, Secure Canvas URL, Unity Binary URL, Site URL, Mobile Site URL, Page Tab URL or Secure Page Tab URL. Check and correct the following domains: … “
Step 2: Insert the Facebook Comments Code into WordPress
In this step you will need to insert 3 blocks of code in 2 different files in order for the Facebook Comments to display on your blog. First, open the header.php file in your theme’s directory and paste the following code after the last meta tag that lives within the opening <head> tag. Then, replace “Facebook App ID Goes Here” with your App ID that was generated earlier. Just an FYI, the quotes are part of the code and should not be removed.
1 | <meta property="fb:app_id" content="Facebook App ID Goes Here"/> |
Now paste the code below after the opening <body> tag in the same header.php file. Once again, replace “Facebook App ID Goes Here” with your App ID.
1 2 3 4 5 6 7 8 | <div id="fb-root"></div> <script>(function(d, s, id) { var js, fjs = d.getElementsByTagName(s)[0]; if (d.getElementById(id)) return; js = d.createElement(s); js.id = id; js.src = "//connect.facebook.net/en_US/all.js#xfbml=1&appId=Facebook App ID Goes Here"; fjs.parentNode.insertBefore(js, fjs); }(document, 'script', 'facebook-jssdk'));</script> |
The last file you need to edit is comments.php. However, before making any changes to the file open the file in an editor and save it as original-comments.php. This renamed file will serve as a backup of the original file just in case you no longer want to use Facebook Comments in the future and decide to revert back to the default WordPress comments. Okay, moving on… in the comments.php file, replace all the code with the code below:
1 | <div class="fb-comments" data-href="<?php the_permalink() ?>" data-num-posts="5" data-width="500" data-colorscheme="light" data-mobile="false"></div> |
Feel free to edit the attributes in the above code to fit the style of your blog’s theme. You can change the width of the comment box (data-width), the number of comments to show as default (data-numposts), and the color scheme (data-colorscheme). You’ll also have the option to configure other settings via the Comment Moderation Tool once Facebook Comments is installed.
Step 3: Facebook Comments Settings
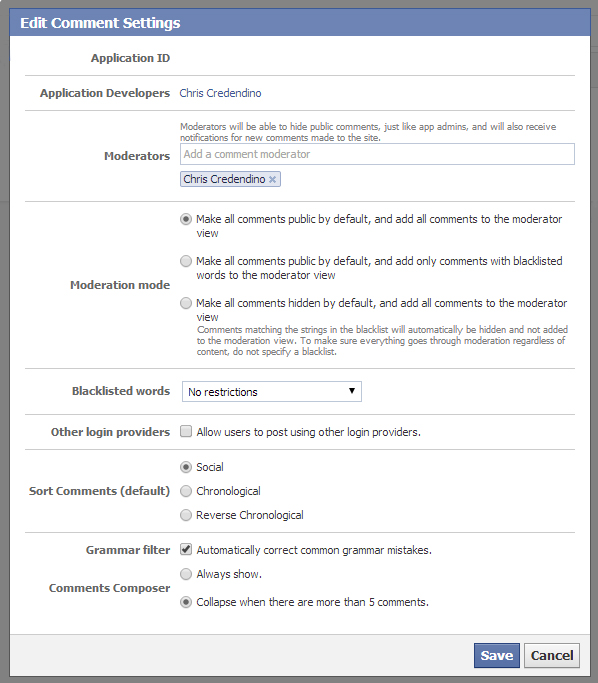
The next step is to configure the comment settings so you can moderate comments, receive new comment notifications, and sort the order of comments.
In order to access these settings you need to visit the Comment Moderation Tool which is located here: developers.facebook.com/tools/comments. Alternatively, you can access this tool simply by visiting the Facebook Comments Box you just installed on your WordPress site. Next, click Settings in the top-right corner to launch the moderation panel.
Once the panel is launched, add yourself as a moderator so you can receive comment notifications and manage all the comments on your blog posts.
Step 4: Display Facebook Comment Count
The last step is to display the comment count throughout your theme. While there are several files you can edit to display the comment count, index.php, single.php, and archive.php are the most common. However, feel free to edit the following files as well: author.php and search.php. Open the files you want to edit and paste the following code wherever you want the comment count displayed:
1 2 3 | <span class="comment-count">
Comments: <fb:comments-count href="<?php echo get_permalink($post->ID); ?>"></fb:comments-count>
</span> |
Step 5: Test Facebook Comments
If you completed all the steps above you should have Facebook Comments up and running on your site. As a test, post a comment on one of your blog posts to make sure everything works as advertised. Also, visit the pages where you inserted the comment count code to make sure the comment count displays properly. Lastly, take a minute to learn how to moderate comments on your blog.
Note: I should point out that if you’re using the Disqus comment system plugin you must deactivate the plugin in order for Facebook Comments to display on your blog posts.
Hopefully this tutorial helped you install the Facebook Comments Box to your WordPress blog.


Comment Section